Quantcast
Channel: Kriztek Blog
Viewing all 141 articles
Browse latest View live

How To Flash Stock ROM Via Manufacturing FlashTool (MFT)

$
0
0

How To Flash Stock ROM Via Manufacturing Flashtool (MFT)


Manufacturing Flash Tool - MFT is for flashing firmwares or OS images to devices that are using Intel Chips e.g Lava Xolo X1000, X900 and some other XOlo series.

If you have got an Intel CPU based phone, you can follow the tutorial below to help you flash firmware using the MFT software.

How To Setup And Use Manufacturing FlashTool (MFT)


  • Download MFT - Manufacturing Flash Tool
  • Extract the content of the zip file. Should be a folder like: Android firmware installation package
  • Open the folder and run/install IntelAndroidDrvSetup1.5.0.exe
  • Once installation is complete, run/install iSocUSB-Driver-Setup-1.2.0.exe
  • Wait for the installation to finalize, the run Manufacturing Flastool setup.
  • Once done, click on File and select setting.
  • Adjust the setting as shown in the screenshot below.


  • Unzip Firmware the downloaded firmware
  • Click on open in MFT and select Flash file.


  • Power off / shutdown your device (Lava X80, for instance) and connect it to the PC.
  • Flashing progress should now begin.
  • Wait for the firmware to flash completely, then reboot your phone.
  • Done
If you had any issue following the procedure, drop a comment and we would assist you.

Download Lava Stock ROMS / Firmwares Here

$
0
0

Download Lava Stock ROMS / Firmwares Here


 Below is a collection of Lava Stock firmwares and their download links. Download and install or flash only the ROM for your device. If your device firmware is not listed here, let us know and we would update our list of Lava ROMS to include yours and other new models.

Collection Of All Lava Stock ROMS / Firmwares


How to Flash Firmware To Your 'Lava' Smartphone

If you have any request or issue, use the comment box.

How To Flash Firmware To Sony Xperia Devices Via FlashTool

$
0
0

How To Flash Firmware To Sony Xperia Devices Via FlashTool


Sony Xperia devices / Sony Mobile headquartered at Minato, Tokyo, Japan is one of the Top 10 Mobile Brands In The World with a good number of both high-end and mid-range devices. 
If you have got a Sony Mobile phone and would want to flash it with its stock firmware for reasons like upgrading the OS, fixing firmware issues like boot-loop, hanging on logo, malware, slow or what ever reason, here is a very comprehensive tutorial to help you flash firmware to any compatible Sony device.

How To Flash Firmware To Sony Xperia Devices Via FlashTool


* Requirements *


    Steps To Flash Firmware To Sony Xperia Devices


    1: Unpack the downloaded Sony Flashtool 0.9.22.3 by Androxyde.
    2: Launch the Flashtool 0.9.22.3.exe application in the extracted folder and follow the on-screen instructions to install it on your PC.

    *Note*
    1. Take note of the installation path for Flashtool. By default it should be C:\Flashtool
    2. Copy the downloaded stock frmware (.ftf file) to C:\Flashtool\firmwares

    3: In FlashTool installation folder, open Drivers 


    and launch FlashTool Drivers


    4: Select and install Fastboot and Flashmode drivers.


    5: Open the installation path again (C:\Flashtool) and run FlashTool which is for X86(32bit) or FlashTool64 (64 bit) depending on your system configuration / architecture.


    6: Click on the Lightning icon before BLU (Boot Loader Unlock)


    7: Select FlashMode in Bootmode Chooser.


    8: Now Select the firmware file from the list, then click Flash


    9: Turn off the Sony Xperia device and put it in FlashMode by holding the back button before connecting it to the PC.


    10: Once the device is connected, flashing will begin. 


    11: Once flashing is done, you can unplug and power on your device manually.


    That's just all. You have successfully flashed your Sony Xperia device's firmware via Sony FlashTool.

    Got an issue ? Use the comments box below.

    Download Sony Xperia Stock ROMS / Firmwares

    $
    0
    0

    Download Sony Xperia Stock ROMS / Firmwares


    Download stock roms for one of the best brands of smartphones in the world. Below is a collection of several Sony Xperia (Experience) smartphone stock firmwares. Make sure you flash only the firmware for your Sony Xperia device because flashing a different firmware will end up bricking your device.

    In need of a firmware that isn't here, kindly request for it via the comments box.

    Collection Of Sony Xperia Stock ROMS / Firmwares / FTF Files


    • SONY Xperia Tablet Z LTE (Version 4.2.2) SGP321 - Download
    • SONY Xperia ZR (Version 4.1.2) C5502 - Download
    • SONY Xperia ZR (Version 4.2.2) C5503 - Download
    • SONY Xperia Z Ultra (Version 4.2.2) C6802 - Download
    • Sony Ericsson Xperia X8 (Version 2.1) E15i - Download
    • Sony Ericsson Xperia X10 (Version 2.3.3) X10i - Download
    • Sony Ericsson Xperia X10 Docomo (Version 2.3.3) SO-01B - Download
    • Sony Ericsson Xperia X10 Mini (Version 2.1) E10i - Download
    • Sony Ericsson Xperia X10 Mini Pro (Version 2.1) U20i - Download
    • Sony Ericsson Xperia Play (Version 2.3.4) R800i - Download
    • Sony Ericsson Xperia Arc (Version 4.0.4) LT15i - Download
    • Sony Ericsson Xperia Arc S (Version 4.0.4) LT18i - Download
    • Sony Ericsson Xperia Neo (Version 4.0.4) MT15i - Download
    • Sony Ericsson Xperia Neo V (Version 4.0.4) MT11i - Download
    • Sony Ericsson Xperia Pro (Version 4.0.4) MK16i - Download
    • Sony Ericsson Xperia Ray (Version 4.0.4) ST18i - Download
    • Sony Ericsson Xperia Mini (Version 4.0.4) SK15i - Download
    • Sony Ericsson Xperia Mini Pro (Version 4.0.4) SK17i - Download
    • Sony Ericsson Xperia Active (Version 4.0.4) ST17i - Download
    • Sony Ericsson Xperia Live Walkman (Version 4.0.4) WT19i - Download
    • SONY Xperia Neo L (Version 4.0.4) MT25i - Download
    • SONY Xperia S (Version 4.1.2) LT26i - Download
    • SONY Xperia SL (Version 4.1.2) LT26ii - Download
    • SONY Xperia U (Version 4.0.4) ST25i - Download
    • SONY Xperia Sola (Version 4.0.4) MT27i - Download
    • SONY Xperia P (Version 4.1.2) LT22i - Download
    • SONY Xperia ION (Version 4.1.2) LT28h - Download
    • SONY Xperia Go (Version 4.1.2) ST27i - Download
    • SONY Xperia Acro S (Version 4.1.2) LT26w - Download
    • SONY Xperia Tipo (Version 4.0.4) ST21i - Download
    • SONY Xperia Tipo Dual (Version 4.0.4) ST21i2 - Download
    • SONY Xperia Miro (Version 4.0.4) ST23i - Download
    • SONY Xperia T (Version 4.1.2) LT30p - Download
    • SONY Xperia TL Bell (Version 4.1.2) LT30a - Download
    • SONY Xperia TX (Version 4.1.2) LT29i - Download
    • SONY Xperia J (Version 4.1.2) ST26i - Download
    • SONY Xperia V (Version 4.1.2) LT25i - Download
    • SONY Xperia TL (Version 4.1.2) LT30a - Download
    • SONY Xperia E (Version 4.1.1) C1505 - Download
    • SONY Xperia E Dual (Version 4.1.1) C1605 - Download
    • SONY Xperia Z (Version 4.2.2) C6602 - Download
    • SONY Xperia Z (Version 4.2.2) C6603 - Download
    • SONY Xperia Z China Unicom (Version 4.1.2) L36h - Download - Part1Part2
    • SONY Xperia Z Docomo (Version 4.1.2) SO-02E - Download -> Part1 - Part2
    • SONY Xperia ZL (Version 4.2.2) C6502 - Download
    • SONY Xperia ZL (Version 4.2.2) C6503 -Download
    • SONY Xperia ZL (Version 4.2.2) C6506 - Download
    • SONY Xperia SP (Version 4.1.2) C5302 - Download
    • SONY Xperia SP (Version 4.1.2) C5303 - Download
    • SONY Xperia L (Version 4.1.2) C2104 - Download
    • SONY Xperia L (Version 4.1.2) C2105 - Download
    • SONY Xperia Tablet Z Wi-Fi 16GB (Version 4.1.2) SGP311 - Download
    • SONY Xperia Tablet Z Wi-Fi 32GB (Version 4.1.2) SGP312 - Download -> Part1 - Part2
    • SONY Xperia Tablet Z LTE Docomo (Version 4.1.2) SO-03E - Download

    If you need any firmware not listed here, please use the comment box and we would add it ASAP.

    How To Flash Stock Firmware To Sony Xperia Devices

    After downloading the firmware for your Sony Xperia device, Click Here To Learn How To Flash It.

    Download Kingzone Stock ROMs / Firmwares

    $
    0
    0

    Download Kingzone Stock ROMs / Firmwares


    Below you can download Kingzone Official Stock ROMs for your Kingzone smartphone. Instructions to flash and tools are also in the downloaded file amd at the post end.

    Only download the firmware that corresponds with your Kingzone smartphone.

    Collection Of Kingzone Stock ROMs / Firmwares

    Model - System Version - Android Version - Release Date


    • Kingzone K2 1481YF.K468A.A1 Android 5.1 2016-04-16 - Download
    • Kingzone  K1 Turbo 0502L049A Android 4.4 2015-01-07 - Download
    • Kingzone  K1 Turbo 0502L009 Android 4.2 2014-12-15 - Download
    • Kingzone N5 K668. A1 Android 5.1 2016-04-26 - Download
    • Kingzone N5 K668. A1 Android 5.1 2015-11-2 - Download
    • Kingzone N3 Plus 20150314_c211_tz_3m_k268 Android 4.4 - Download
    • Kingzone Z1 Plus c221v53 Android 5.1 2016-03-18 - Download
    • Kingzone S1 v04.0-0611 Android 4.2.2 2014-06-11 - Download
    • Kingzone S2 MUL.P5 Android 6.0 2016-08-25 - Download


    How To Flash Firmware To Kingzone Smartphone 

    To Flash The Kingzone official Firmware, Click Here

    Download iNew Stock ROMs / Firmwares

    $
    0
    0

    Download iNew Stock ROMs / Firmwares

    download inew stock roms


    Below is a collection of iNew Android stock firmwares. If you need any firmware or had an issue with the ROM / installation, kindly use the comment box.

    Collection Of iNew Stock ROMs / Firmwares


    • iNew i6000 MT6589 - Download
    • iNew i7000 MT6589 - Download
    • iNew i8000 M6582M - Download
    • iNew V3 Plus MT6592 - Download
    • iNew V3 Plus CXQ_V3A_INEW_V07.zip   2014-12-24 - Download
    • iNew V8 cxq1-inew_v8.rar   2014-12-24 - Download
    • iNew V8 MT6591 - Download
    • iNew V8 Plus - MT6592M - Download
    • iNew V8 Plus 20150313_e2702v92_cxq1_v8plus.rar - Download
    • iNew L4 ROM Android 5.1 Update V1.0.8 - Download 
    • iNew U5 ROM Android 5.1 Update V1.0.6 - Download 
    • iNew U3 ROM Android 5.1 Update V1.1.2 - Download 
    • iNew V3-v1.1.3 Firmware 2015-01-14 - Download 
    • iNew V7A_4.4_v1.1.0.zip 2015-04-27 - Download 
    • iNew U1_2.0.1.zip   2015-04-27 - Download 
    • iNew V1-a-20150422.zip 2015-04-27 - Download 
    • iNew L1 CXQ_INEW_L1-A_v1.0.8.zip 2014-12-24 - Download 
    • iNew V3C_v1.0.1.zip 2014-12-24 - Download 

    To flash the iNew stock firmware, Click Here.

      Download Vernee Stock ROMs / Firmwares

      $
      0
      0

      Download Vernee Stock ROMs / Firmwares

      Here you can comfortably download the stock firmwares for Vernee smartphones. These firmwares can help you fix all manner of issues related to the phone's software like hanging, boot-loop, restart, malware attack etc.

      If you need any firmware, let us know via comments. Although, the list would always be updated.

      Collection Of Vernee Stock ROMs / Firmwares

      • Vernee Thor MT6753 (SD Card) - Download
      • Vernee Thor K06TD-A.A.vR18.N0.160504 Android 6.0 (SP Flash) - Download
      • Vernee Appolo Lite MT6797 (SD Card) - Download


      How To Update / Flash Vernee Smartphone Via SP Flashtool. 

      To Flash Vernee Stock Rom via Sp Flashtool, Click Here


       How To Update / Flash Vernee Smartphone Via SD Card. 


      • Make sure your Vernee device's battery is charged to avoid issues during the flashing process.
      • Download the ROM file via above link, copy and paste the ROM file to internal storage.
      • Click “Setting” icon -> “About Phone”->“wireless update”, then click the icon at the top right corner, and choose “Local updates”.

      • Click into “internal storage”, find the ROM file and choose it.
      • Click “Install now” and a POP box appears; choose “OK” to update.
      • The ROM installation will start and finish after a while. During this period, your device will reboot into the newly installed ROM. 
       If you have any issue, drop a comment below.

      Download UHans Stock ROMS / Firmwares

      $
      0
      0

      Download UHans Stock ROMS / Firmwares


      Below you can download the latest firmwares for your UHans smartphone. 

      If you have any question, request or whatever related to this, use the comments box. 

      Collection Of UHans Stock ROMS


      How To Flash Stock ROM To UHans Smartphone

      After downloading the stock rom for your UHans device, follow the guide here. 

      Download Uhappy Stock ROMs / Firmwares

      $
      0
      0

      Download Uhappy Stock ROMs / Firmwares


      Below you can find official stock firmwares for Uhappy devices. We would always try to keep the list updated.  Instructions to help you flash the firmware is given at the post end.

      If you encounter any issue or need a rom not listed here, kindly use the comment box.

      Collection Of Uhappy Stock Firmwares


      To flash the Uhappy ROM , Click Here

      Download Micromax Stock ROMs / Firmwares Here

      $
      0
      0

      Download Micromax Stock ROMS / Firmwares Here


      Looking for firmwares for Micromax ? Download all Micromax stock ROMS / Firmwares here. Ony download and flash the one that corresponds with your Micromax device model. Flashing a wrong one will cause serious issues on your device.

      If you dont find the ROM for your Micromax, drop a comment and we will update the list.

      Collection Of Micromax Smartphone Stock ROMS / Flashfiles


      - Part-2 - Download
      - Part-3 - Download
      - Part-2 Download
      • Micromax A57 (microSD) Part-1 - Download
      - Part-2 - Download
      - Part-2 - Download

      How to Flash Stock ROM / Firmware To Your 'Micromax' phone

      Download OnePlus 1+ Oxygen OS Stock ROMs

      $
      0
      0

      Download OnePlus Oxygen OS Stock ROMs


      Below you can download official OnePlus Stock ROMs and also learn how to install it (Oxygen OS) on your OnePlus device.

      Endeavor to download the ROM for your specific device and follow the instructions to flash it. Before flashing the ROMs, please read and understand the difference between OnePlus official and community builds.

      Diffrence Between OnePlus Official And Community Builds

      Before downloading and as well flashing any of the OnePlus Stock ROMs below, you need to understand the differnce between the official build (mostly recommended) and the community build. 

      • OnePlus Official Build : This is what you get out of the box when you purchase a OnePlus smartphone. The official builds / OTAS are very stable or kinda bug free. It's the final OS that is sent to every OnePlus owner anywhere via OTA. It is safe and can be used as a daily driver without any issue. 
      To make it clear, it is simply the original OS meant for every OnePlus owner and is hitch free.

      • OnePlus Community Build : The Community Build is the Beta build of the OS. Although it can be installed and used, it naturally has bugs and cant serve as a daily driver. OnePlus uses the community builds to test new things, discover bugs, fix bugs, know what's working and what isn't, know what is missing and what is not and a whole lot more. 
      This build gets frequent updates / OTA which addresses or fixes the bugs in the previous versions / builds. If there is any other issue, future builds will fix it. The community builds are for those who wish to experiment with their OnePlus and give feedback so as to get the best user experience. Its OnePlus way of relating with their users and giving them exactly what they want.
      The community build regularly receives updates specifically for that build. If you flash this community build, you’ll receive community OTAs (but not official OTAs). You’ll need to manually (clean) flash back to official builds to continue receiving official OTAs. Rolling back to official OxygenOS versions require wiping data and cache.

      Finally, OP summarizes with this; 
       “With the community build we are experimenting with new ideas and features, and then using the feedback from our community to refine… In fact, the next versions of the community build will address a lot of the feedback we have already received.”

      Now you can download the build that you would be comfortable with.


      Collection Of OnePlus ( 1+ ) Stock Firmwares


      • OnePlus One Oxygen OS v2.1.4 Official Build 2016-01-19 - Download
      • OnePlus One Oxygen OS v1.0.3 Official Build 2015-09-02 - Download
      • OnePlus 2 Oxygen OS v3.1.0 Official Build 2016-08-26 - Download
      • OnePlus 2 Oxygen OS v3.0.1 Community Build 2016-05-23 - Download
      • OnePlus 3 Oxygen OS v3.2.6 Official Build 2016-09-14 - Download 
      • OnePlus 3 Oxygen OS v3.5.4 Community Build 2016-10-17 - Download
      • OnePlus X Oxygen OS v3.1.3 Official Build 2016-09-29 - Download
      • OnePlus X Oxygen OS v3.1.3 Community Build 2016-09-08 - Download

      How To Flash Stock ROM (.zip File) To OnePlus Device


      1. Download the software build for your OnePlus device at the top of this page.
      2. Plug your phone into your computer and copy the downloaded .zip file to your phone’s storage. If you’re using a Mac, you can install Android File Transfer for this operation.
      3. After the .zip file is copied to your phone, reboot your phone into recovery mode. To do this, shut down your device and turn it back on while holding the power and volume down buttons simultaneously.
      4. Choose "Install from local / Install from SD", find your .zip file and click on "Install" to confirm.
      5. Wait a while, your phone should now update to the selected build and reboot automatically to take you into OxygenOS.
      If you have any issue, don't hesitate to drop a comment.

      Download Infinix X551 Hot Note MT6580 Clone ROM

      $
      0
      0

      Download Infinix X551 Hot Note MT6580 Clone ROM

      The rate at which cloned devices are flooding the market is becoming alarming. Although there are so many clones of original mediatek and spreadtrum smartphones out there and we have been able to share the LG V10 MTK clone, Infinix Hot 2 clone, Blackberry Z10 clone and others.

      Well today I am sharing the ROM dump of the clone ot another prominent phone; Infinix Hot Note X551. This clone looks exactly like the original and would be kinda hard to recognize unless you have probably seen and used the original.

      Talking about the chip, the original uses a Mediatek MT6592 chip while the clone uses the MT6580 chip. The original Hot Note runs on Android 4.4.2 or 5.1 Lollipop (via update) while the fake X551 is faked to show Android 6.0 Marshmallow. More of the original X551 specs is here 

      If you know your Hot Note is a fake and you have software related issues, you can download and flash the stock to recover or fix your device. 

      Note:

      Don't flash this firmware on any other Infinix device or else you are responsible for the outcome. Make sure your device matches the one in this post. If you need more assistance, let us know via the comments box.

       Download Infinix X551 Hot Note MT6580 Clone ROM


      To download the Infinix Clone X551 Hot Note MT6580 ROM, Click Here and flash it using any box software e.g Miracle box (Recommended)

      If you have any issue, use the comment box

      Download XZ iPhone i6S+ MT6572 Clone ROM

      $
      0
      0

      Download XZ iPhone i6S+ MT6572 Clone ROM

      [Image:iphone 6s+ mt6572 stock rom mtk]


      The iPhone 6S Plus has got some real clones like theInfinix Hot 2 and Infinix Hot Note X551. The clones of this popular phone are numerous and cant be figured out unless you go through the phone carefully.


      You Might Also Like To See


      Today I am sharing the firmware for XZ iPhone 6S+ which uses an MT6572 Mediatek processor. The ROM is purely stock or kinda official and have not been tampered with. Before proceeding with the download, kindly take note of the specs of this iPhone clone so as not to flash it to the wrong phone.

      MTK iPhone i6S+ Specs

        • Chipset : MT6572 Chip
        • Android Version : 4.4.2
        • Build ID :a825_324_ax_xz_k2_i6s_v1.04_01042016
        • Brand : i6S+
        • Manufacturer : Alps

        To Download XZ iPhone i6S+ MT6572 ROM

        Click Here


        To Flash The i6S+ Clone ROM, Click Here

        If you have any issue, use the comment box.

      How To Find Specific Text On A Webpage On All Browsers

      $
      0
      0

      How To Find Specific Text On A Webpage On All Browsers

      How To Find Specific Text On A Webpage


      Have you ever visited a website that is so jam packed with text, images, icons and other stuffs to the extent where you couldn't even find what actually brought you to that site ? 

      You could be a journalist, student or teacher who is trying to copy down a particular text you saw while researching on a website like Wikipedia.

      You could be an Android phone user trying to find the stock firmware of your phone on a particular site which practically has a long list of stock firmware but isn't properly arranged.

      Most especially, when browsing sites with a lot of text and you want to note down or quote and important text you came across, reading all through or in between the lines would just be as stressful as it sounds.

      This is one thing that happens to everybody or a few who haven't discovered the hidden treasures around them.
      I remember when I was trying to find a specific firmware on a very popular site, I had to manually scroll down and look at each firmware name so as to find the specific firmware with its build number.

      This list was about 400+ SPD PAC FILES  and wasn't really arranged alphabetically. It was when I got to about a 100 or so, I then murmured to myself, 

      " What am I doing? What if I have passed the file I was looking for ?"

      It was then I immediately remembered the shortest way out which I am going to share very soon.  I bet you, you will find this simple tip very useful when the time comes.


      How To Find Specific Text On A Webpage While Browsing Via Google Chrome


      While using one of the most popular and user-friendly web browser, finding text shouldn't be an issue on less you probably have serious eye problems of which accessibility settings can take care of.

      On an Android phone with Google Chrome browser installed, launch the browser and open the desired Web page.

      Tap on the 3 vertical dots at the top right, after the address bar. In the list that pops up, select the "Find in page"

      In the box that appears, type the text and you will see all the matched text highlighted and the total number written by the right.

      You can use the up ^ and down arrows to scroll between the text found and the close × button to close the search. 

      When browsing a page via Chrome browser on your PC, to find a text on a specific page, press CTRL + F on your Keyboard


      to bring up the search box.


      A search box will appear. Enter the desired text you wish to find on the particular page inside the search box and hit the Enter button.


      As you can see above, the page has 5 instances of MT6577 mentioned on that page and pressing the Enter button will take me to each of them.

      Its as simple as it seems. This is one shortcut bloggers always use when editing their template via HTML. But most people forget to use it in the "real world" scenario.


      How To Find Specific Text On A Webpage While Browsing Via Firefox


      Firefox is one web browser I personally love because it has some extremely unique features other browsers don't have. Well, apart from using the general method for searching of text on web pages above, Firefox has added something that makes it seamless / automatic when ever you wish to find text.

      To automatically find any text on a particular page without pressing the CTRL +  F keys, just do this on Firefox.

      1. Open Firefox and  click on the Menu icon at the top right, just under the close (X) button.
      2. Select the Options. You should now be in Firefox Browser Setup menu.
      3. Click on Advanced and then tick "Search for text when I start typing"
      4. And that's all ! Next time when you are reading a webpage and you wanna search a particular phrase, just start typing the word (s) and instantly, you will get results related to what you typed.


      How To Find Specific Text On A Webpage While Browsing Via iPhone Safari


      You shouldn't expect anything less from Android and Windows rival, Apple. Apple iOs is naturally very friendly apart from their iCloud issues.

      Well if you have got an Apple device and would want to know how you can find text on the page you are currently viewing, just follow this simple steps.

      1. Launch Safari browser and open the page you wish to search text on.
      2. Tap on the top of the screen to make the URL bar and sharing buttons visible in Safari, then tap on the Share button which looks like a little box with an arrow coming out of it.
      3. Scroll through the secondary action items in the Sharing options screen, scroll past Favorites, Add Bookmark, Copy, etc to find “Find On Page
      4. Type the text or number to search on the current webpage, then tap on the “Search” button, the first match will immediately be visible and highlighted in the Safari browser
      5. Use the arrow keys next to the search box to find next and previous text matches for your search phrase on the web page, when finished tap on “Done
      Credit - OSXDAILY

      How To Find Specific Text On A Webpage While Browsing Via Internet Explorer 8, 10 And 11.


      If you are using Internet Explorer on your windows computer to surf the internet, and you want to find text on a particular page, it is also easy.

       To find text on a page using Internet Explorer 8, 10 or 11 without toggling too many settings, just press CTRL + F (Control + Key F)  and type the text in the box at the left with Find written before it.

      The matched text will be highlighted and the number of matched text will be written at the right. If you wish to go through all the matched text, use the Previous and Next buttons by the right.

      The more you start using this, the better your web experience would be. Students, researchers, bloggers and web surfers can't get the best of the real web without this little tool.


      If you find this interesting, share and also comment. 

      How To Install / Fix ADB & Fastboot Drivers On Windows

      $
      0
      0

      How To Install / Fix ADB & Fastboot On Windows

      How To Install / Fix ADB / Fastboot On Window


      Almost 80% of Android users are aware of the term ADB / Fastboot but its just a few that actually utilize it. Although its for developemental use or the kinda techy Android users..

      This tutorial can help you install and get ADB / Fatboot to work on a clean computer computer and also help you fix issues after previously installing ADB / Fastboot drivers. If ADB dependent apps don't detect your phone, it actually shows you have to fix ADB on your PC.

      Using Windows 7, 8 or even 10? You can as well use this tutorial to help you install or fix adb / fastb oot drivers on your PC.

      Lets see what Google has to say about ADB.

      ADB - Android Debug Bridge


      Android Debug Bridge (adb) is a versatile command line tool that lets you communicate with an emulator instance or a connected Android-powered device. It is a client-server program that includes three components. ADB is like a bridge that connects your phone to your computer and allows you perform a whole lot of tasks, both simple and advanced.

      ADB / Fastboot can also help in unbricking phones, flashing stock firmwares, mods etc. The thing is, it gives you the ability to perform developer kinda tasks on your Android device with or without root access.
        In order to use adb with a device connected over USB, you must enable USB debugging in the device system settings, under Developer options.
        On Android 4.2 and higher, the Developer options screen is hidden by default. To make it visible, go to Settings > About phone and tap Build number seven times. Return to the previous screen to find Developer options at the bottom.


        On some devices, the Developer options screen may be located or named differently.
        Note: When you connect a device running Android 4.2.2 or higher to your computer, the system shows a dialog asking whether to accept an RSA key that allows debugging through this computer. 

        This security mechanism protects user devices because it ensures that USB debugging and other adb commands cannot be executed unless you're able to unlock the device and acknowledge the dialog. This requires that you have adb version 1.0.31 (available with SDK Platform-tools r16.0.1 and higher) in order to debug on a device running Android 4.2.2 or higher.


        How To Install / Fix ADB & Fastboot Drivers On Windows


        Step 1.  Download 15 Seconds ADB / Fastboot Installer and install it on your windows PC. You can alternatively download and install Intel Android USB Driver to your computer.

        Note: If you  encounter signature verification issues, Check Here. Always restart your PC after a successful installation.

        Step 2.  Launch the ADB / Fastboot installer and press Y(Yes) to install ADB and Fastboot drivers. Follow all the steps to continue the driver installation. Once completed you will see fastboot/adb folder on your C drive(C:\adb).


          Now the Files are installed on your desktop, next step is to configure them and setup the drivers.

        Step 3.  On your Andriod phone, enable USB Debugging. Older devices can enable debugging in Settings > Application > USB Debugging.

         To do that on newer Android versions 4.2 and higher, go to Settings> About Phone and tap on Build Number 7 times until you’ve enabled Developer Options, then go back to the main settings menu and go to Developer Options which should just be above About Phone. Enable Android Debugging / USB Debugging mode by marking it.

        Step 4.  Now connect your phone to the PC with USB cable and open Device Manager. To open device manager, (Right Click My Computer and select Manage, then Device Manager) and look for your phone. It will show up under Portable Devices as your phone model number or Other Devices or ADB Interface or Android.


        Step 5.  Right-click on it and select update driver software.


        Step 6.  Now a new popup windows will appear on your screen. From here click on the “Browse my computer for driver software


        Step 7.  Now from the next screen click on the “Let me pick from a list of device drivers on my computer” and hit the next button.


        Step 8.  From the next screen click on the “Android Phone” option and hit the next button to proceed.


        Step 9.  Now on the next screen you will see all the ADB drivers that are installed on your windows computer. Now select the “Android ADB Interface” and click on the next button to complete the setup process.


        Step 10.  ADB Drivers will now be properly installed / fixed.


        To check if its working, open a command prompt window by;

        • Clicking on Start, in the search box type cmd and select cmd.exe.  
        • Connect your Android device (USB Debugging enabled) and type the command below in the cmd window, then hit the Enter key.
         adb devices
        • Your device ID will be displayed. Note, you might get a USB Debugging notification on your screen depending on your Android version. Accept all on-screen debugging notifications.
        • If it doesn't work, turn off debugging, turn it on again and connect your phone.
         

        Alternatively, you can go to the ADB folder on your C Drive which the 15 seconds ADB Installer created on Step 2.

        Step 11.  Inside your fastboot/adb folder (C:\adb\), hold the Shift key on your keyboard and right-click on an empty space and select Open command window here.


        Step 12.  Now the command prompt window will appear. Connect your device and enable USB Debugging. Type adb devices and hit Enter key. Your device's ID should now show under list of connected devices.


        Now you have ADB / Fastboot drivers properly installed and your Android phones can successfully connect to the window PC.
        Setup ADB & Fastboot Drivers Step 1. To get started, download the 15-second adb/fastboot installer here and run the file on your windows desktop. Step 2. Press Y/Yes to install ADB and Fastboot drivers and follow all the steps to continue the driver installation. Once completed you will see fastboot/adb folder on your C drive (C:\adb).

        Setup ADB & Fastboot Drivers Step 1. To get started, download the 15-second adb/fastboot installer here and run the file on your windows desktop. Step 2. Press Y/Yes to install ADB and Fastboot drivers and follow all the steps to continue the driver installation. Once completed you will see fastboot/adb folder on your C drive (C:\adb). ADB-Installer Step 3. Now the Files are installed on your desktop, next step is to configure them and setup the drivers. Step 4. Pick your phone up and go to Settings > About Phone and tap on Build Number 7 times until you’ve enabled Developer Options, then go back to the main settings menu and go to Developer Options that magically appeared right above About Phone. And Enable Android Debugging / USB Debugging mode. Step 5. Now connect your phone to the PC with USB cable and open Device Manager and look for your phone. It will show up under Portable Devices as your phone model number or Other Devices or ADB Interface or Android. See the screenshot below:- ADB-Interface Step 6. Right-click on it and select update driver software. Update-Driver-Software [wpsm_ads1] Step 7. Now new popup windows will appear on your screen. From here click on the “Browse my computer for driver software” Browse-Computer-For-Drivers Step 8. Now from the next screen click on the “Let me pick from a list of device drivers on my computer” and hit the next button. Let-Me-Picks-Drivers Step 9. From the next screen click on the “Android Device” option and hit the next button to proceed. Android-devices Step 10. Now on the next screen you will see all the ADB drivers that are installed on your windows. Here select the “Android ADB Interface” and click on the next button to complete the setup process. ADB-Drivers-Setup Step 11. ADB Drivers are now properly installed. To check it is working or note. Go to the ADB folder on your C Drive which the installer created on Step 2. Step 12. Connect your phone to the PC and open a command window in your fastboot/adb folder (C:\adb\). To do this Hold Shift button on your keyboard and right-click on the empty space of the folder. See the screenshot:- ADB-FIles Step 13. Now the command prompt windows will appear on your desktop. And enter the following command and you will see the screen with a list of devices attached. This means the drivers are properly installed and your android is successfully connected to the window PC. adb devices Adb-devices-attached Enjoy !


        How To Backup MTK Android Firmware Via SP Flashtool

        $
        0
        0

        How To Backup / Dump MTK Android Firmware Via SP Flashtool

        How To Backup / Dump MTK Android Firmware Via SP Flashtool

        How To Backup / Dump MTK Android Firmware Via SP Flashtool


        You actually feel a lot safer when you have the stock backup or ROM of your MTK Android device. Since Android is so user friendly and tweakable, there are times when you might accidentally or carelessly mess up the whole phone. This is where the stock firmware comes in.

        Having the stock firmware of your MTK Android device can save you from so many issues regarding your phone's firmware. Issues like virus infection, boot loop, unable to power on, error 4032 and a whole lot of others.  

        Below is a very simple tutorial that will show you how to backup your Mediatek Android device's stock firmware so that you can use it to fix issues that may arise on your phone as well as others(same model / specs).

        Note:  Just to add, you don't have to root your device or install the entire apps on Google play store before you backup your ROM. You only need your phone(well charged), a good USB cable, a Windows PC and patience.

        Using MTK Droidtool to backup your firmware requires a pre-rooted device while SP Flashtool doesn't. This is one benefit you get especially when you need a clean MTK ROM without root so as to enjoy OTA updates or whatever you want.

        The tutorial below will enable you backup the entire firmware and save it in an SP Flashtool flash-able format.

        Requirements

        To get things ready for a successful MTK firmware backup, follow the instructions below.

        • Download Mediatek SP Flashtool - Download
        • Download MTK Droid Root & Tools v2.5.3 - Download
        • Download and install Note++ to your PC. - Download
        • Install ADB Drivers on your PC. - Check Here
        • Install Mediatek USB VCOM Drivers on your PC. - Check Here.

        Steps To Backup / Dump Mediatek Android Firmware  

         Dumping the ROM using SP FLASHTOOL


         Before proceeding, make sure all the requirements above have been successfully passed or else you might get issues during the process.

        Step 1.  Unpack the MTK Droid Root & Tools v2.5.3 and SP Flashtool you downloaded above so as to access its contents.

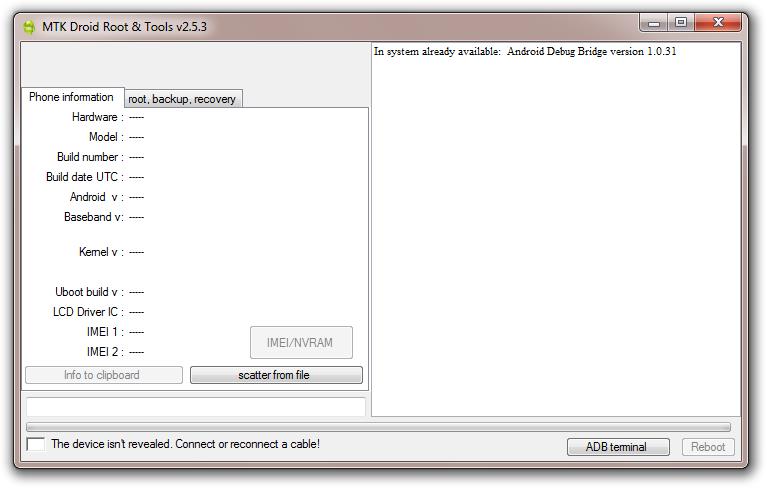
        Step 2.  Open the MTK Droid Root & Tools folder and double click on the file named MTKdroidTools.exe MTK DroidTools should now open.


        How To Backup / Dump MTK Android Firmware Via SP Flashtool

        Step 3.  Turn on USB debugging on your MTK Android and connect it via a good USB cable to your PC. MTKDroid Tools will now detect your phone and display its specs. 
        Note:Make sure usb debugging is on and accept any prompt.

        Step 4.  Click Blocks Map

        How To Backup / Dump MTK Android Firmware Via SP Flashtool
          The most needed file for the backup; Scatter file, can now be created automatically.

        Step 5.  Under Block Info, click on Create scatter file

        How To Backup / Dump MTK Android Firmware Via SP Flashtool

        Step 6.  Select a convenient location to save the scatter file.


        Step 7.  Open SP Flashtool folder and launch flash_tool.exe
        SP Flashtool should now open.

        Step 8.  Click on folder icon with Choose, just after scatter loading file.  Now locate the scatter file you saved in Step 6 and click Open.


        Step 8.  After the scatter file has been loaded, Click on the Readback tab.


          Step 9.  Click on Add.

        A scattter value for readback should now be loaded.


        Step 10.  Double click under File


         Step 11.  Now you are to input the address of the last partition from the scatter file you saved. Note: Make sure Hex is ticked and also leave the Start Address as it is. 


        Step 12.  Go back to the location of the scatter file, right-click on it and select Edit with Notepad++

        Step 13.  Scroll down to the last partition, mostly FAT or User Data and then, carefully copy the value after linear_start_addr: which starts with 0x........


        Step 14.  Now paste the value you copied in the box just after Lenght. It should now look like the image below. Select OK to proceed.


        Step 15.  Click on Readback


        Turn off your phone and then connect it to the PC. SP Flashtool will start reading the entire firmware / ROM. It is going to take a while depending on the overall size of the firmware.


        Note: Make sure you do not interrupt it or else you might end-up bricking the device.

        Step 16.  When you see a notification; Readback OK,


         disconnect your phone and turn it on. Now the ROM has been dumped with a format ROM_. You can change the 0 to any other number or leave it as it is(ROM_0). Select the location you wish to save the ROM_0 file and click Save.

        Steps To Backup / Dump Mediatek Android Firmware  

         Unpacking the ROM_0 For Use With SP FLASHTOOL


        Step 17.  Launch MTKDroidtool.exe in Step 2 and connect your phone. Click on the root, backup, recovery tab.


        Step 18.  Click on the option To process file ROM_ from flashtool


         Step 19.  Find the ROM_ file you saved, select it and click Open.

         .
        Step 20.  MTKDroid Tools will start unpacking the ROM_0 file from flashtool.

        Note:  If you get a prompt asking you to Make CWM recovery, click Yes for the tool to port CWM for your phone or click No if you wish to retain the stock recovery.


        Its also going to take a while and you should see task is complete when all the files / partitions have been successfully unpacked from the ROM_ file.


        Step 21.  The firmware would be automatically saved in the MTK Droid Tools folder. MtkDroidTools > backups. There you will find the firmware with its scatter file which you can use in future to fix your MTK phone or another of the same model.

        That's all you need to do to backup your stock MTK Android firmware

        If you have any issue, kindly use the comment box.

        Download Samsung Galaxy S6 SM-G9200 MT6572 Firmware

        $
        0
        0

        Download Samsung Galaxy S6 G9200 MT6572 Firmware

        Download Samsung Galaxy S6 G9200 MT6572 Firmware

        If you have been searching for the stock firmware of the "Samsung Galaxy S6 G9200 MT6572" clone, you can download it here.
        You might need the firmware if your G9200 S6 clone has been seriously infected by malware, it hangs on logo, boot-loop, dead due to wrong firmware or "Enable DRAM Failed" error.

         Always make sure your device matches the specs of the ROM provided before tampering with your OS. To be very sure, below is the specs of the cloned Samsung Galaxy S6 G9200.


        Here Are Similar Posts


        id:ALPS.KK1.MP6.V1
          version:4.4.2
          model:G9200
          brand:alps
        >>manufacturer:alps

        Download Samsung Galaxy S6 SM-G9200 MT6572 Firmware


         Samsung Galaxy S6 SM-G9200 MT6572 Stock Firmware
        - Download -


        Flashing Samsung Galaxy S6 SM-G9200 MT6572 Firmware
        After successfully downloading the firmware, to flash it
         Click Here
        If you have any issue, Use the comment box.

        Download Samsung Galaxy Grand Duos I9082 MT6577 ROM

        $
        0
        0

         Download Samsung Galaxy Grand Duos I9082 MT6577 ROM


         Download Samsung Galaxy Grand Duos I9082 MT6577 ROM


        Got a fake Samsung Galaxy Grand Duos and you need the firmware, its right here. Like seriously, this Samsung I9082 clone with an MT6577 Mediatek processor hidden inside is so identical to the original I9082.

        It even enters a fake download mode like other Samsung Android devices. But, Odin will never find it. You can figure out its real id via ADB or using an app that displays in-depth phone info e.g CPU-Z

        If you happen to purchase this very popular cloned Samsung I9082 and encounter issues related to your firmware, you can download this ROM and flash it using the tutorial.

        Note:  Make sure your device is the same as mentioned above before flashing the firmware. Flashing this I9082 cloned ROM on anything other device will actually render it useless.


        Samsung Galaxy Grand Duos MT6577 Clone Stock ROM - Download

        How To Flash The Samsung Cloned I9082 Firmware - Check Here


        If you need any assistance, just drop a comment.

        Download MBO V8 Stock Firmware

        $
        0
        0

        Download MBO V8 Stock Firmware

        Download MBO V8 Stock Firmware


        Have you been looking for the stock firmware for MBO V8? If yes, then you are in the right place. Once upon a time, I also got issues with this Chinese phone called MBO V8. If your MBO V8 is dead due to wrong firmware, formatting with box or whatever, you can revive it with this file. 

        The file is in .bin format which can be flashed using any of those good china flashing boxes / softwares like miracle box, Infinity Chinese Miracle 2, Volcano, etc. 

        Note: This firmware has been tested and it has successfully fixed dead MBO V8(s). I just wanna share it so that someone out there can smile again.

        Please do not use this ROM on any other device or else you would not like the outcome. Well fear not, your MBO V8 wont die again after flashing this file.

        Download MBO V8 Stock ROM (bin format)


        How To Flash MBO V8 .BIN FILE


        For those who also want the factory format file (pac), I will upload the .pac file as soon as possible.


        If this was helpful, comment and share.

        Download Custom Recoveries For All MTK Android Devices

        $
        0
        0

        Download Custom Recoveries For All MTK Android Devices

        Download Custom Recoveries For All MTK Devices

        Download Custom Recoveries For All MTK Devices


        Custom android recoveries like TWRP, CWM-ClockworkMod, Philz Touch, CTR, Cyanogen Recovery etc are more feature rich than stock recoveries. 
        One of the most important and used benefit of custom recoveries over stock is the ability to do a full firmware backup of the current OS. The custom recovery will also allow you to restore the saved backup so as to bring back / restore your phone to its original state.

        The benefits of installing a custom recovery are so numerous and varies based on user needs. Most Mediatek smartphone users install custom recoveries on their MTK phones to enable them to install custom ROMS, flash zip files and especially to achieve root access. This comes handy if you are using one of those new Android lollipop or later devices with new SOCs and those that can't be rooted via One-Click root methods.


        Also note that flashing an incompatible custom recovery to your Mediatek device can permanently or temporarily brick it, make you loose your IMEI which will result to invalid / null imei, cause boot-up issues as well as other malfunctions. Having read all these, be careful not to flash a wrong custom recovery to your MTK android device.


        You Might Want To Read


        If you couldn't find a compatible custom recovery for your MTK phone, kindly drop a comment with your device model / brand instead of trying to flash something different.

        We would keep updating the list as new custom recoveries are being ported to existing as well as newer MTK devices.


        Download Custom Recovery For All Tecno Android Phones

        Below is a collection of working custom recoveries for all MTK Tecno Android phones. As time goes on, the list will always be updated.

        • Tecno Camon C9 Custom Recovery (TWRP) - Download
        • Tecno Camon C8 Custom Recovery (TWRP) - Download
        • Tecno Camon C5 Custom Recovery (TWRP) - Download
        • Tecno D5 Custom Recovery (CWM) - Download
        • Tecno D3 Custom Recovery (CWM) - Download
        • Tecno F5 Custom Recovery (CWM) - Download
        • Tecno G9 Custom Recovery (CWM) - Download
        • Tecno H5 Custom Recovery (CWM) - Download
        • Tecno H6 Custom Recovery (CWM) - Download
        • Tecno H7 Custom Recovery (CWM) - Download
        • Tecno Boom J7 Custom Recovery (CWM) - Download
        • Tecno Boom J8 Custom Recovery (TWRP) - Download
        • Tecno L3 Custom Recovery (CWM) - Download 
        • Tecno L7 Custom Recovery (CWM) - Download
        • Tecno L8 Plus Custom Recovery (CWM) - Download
        • Tecno L8 Plus Custom Recovery (TWRP) - Download 
        • Tecno M3 Old OS (4.2) Custom Recovery (CWM) - Download
        • Tecno M5 Custom Recovery (ClockworkMod) - Download 
        • Tecno M6 Custom Recovery (TWRP) - Download
        • Tecno M9 (A3) Custom Recovery (CWM) - Download
        • Tecno N3 Custom Recovery (CWM) - Download
        • Tecno N9 Custom Recovery (CWM) - Download
        • Tecno N7 Custom Recovery (CWM) - Download
        • Tecno P5 Old OS (4.2) Custom Recovery (CWM) - Download
        • Tecno P9 Custom Recovery (ClockworkMod) - Download
        • Tecno P9 (4.2) Custom Recovery (CWM) - Download
        • Tecno Phantom Z (A7) Custom Recovery (CWM) - Download
        • Tecno Phantom A (A7) Custom Recovery (CWM) - Download
        • Tecno Phantom 6 Custom Recovery (TWRP) - Download
        • Tecno Q1 (4.0) Custom Recovery (CWM) - Download
        • Tecno R7 Custom Recovery (CWM) - Download
        • Tecno S3 Custom Recovery (CWM) - Download 
        • Tecno S7 Custom Recovery (CWM) - Download
        • Tecno W4 Custom Recovery (TWRP) - Download
        • Tecno Y6 Custom Recovery (CWM) - Download 


        Download Custom Recovery For All Infinix Android Phones

         
        Download Custom Recovery For All Infinix Android Phones

        Below is a collection of working custom recoveries for all MTK Infinix Android phones. As time goes on, the list will always be updated.


        • Infinix Hot 2 X510 Custom Recovery (TWRP) - Download
        • Infinix Hot 3 X554 Custom Recovery (TWRP) - Download
        • Infinix Hot 4 Pro X556 Custom Recovery (TWRP) - Download
        • Infinix Hot 4 X557 Custom Recovery (TWRP) - Download
        • Infinix Hot S X521 Custom Recovery (TWRP) - Download
        • Infinix Hot Note X551 Custom Recovery (Philz Touch) - Download
        • Infinix Note 2 X600 Custom Recovery (TWRP) - Download
        • Infinix Note 3 PRO X601 Custom Recovery (TWRP) - Download
        • Infinix Zero 3 X552 Custom Recovery (TWRP) - Download


        Download Custom Recovery For All Elephone Android Phones

        • Elephone P8000 Custom Recovery (Philz Touch) - Download
        • Elephone P9000 Custom Recovery (TWRP) - Download
        • Elephone P9000 Lite Custom Recovery (TWRP) - Download
        • Elephone P7000 Custom Recovery (TWRP) - Download
        • Elephone P5000 Custom Recovery (TWRP) - Download
        • Elephone P6000 Custom Recovery (CWM) - Download
        • Elephone S3 Custom Recovery (TWRP) - Download
        • Elephone Trunk Custom Recovery (TWRP) - Download
        • Elephone Vowney Lite Custom Recovery (TWRP) - Download


          Download Custom Recovery For All Gionee Android Phones

           Download Custom Recovery For All GIONEE Android Phones


          • Gionee Dream D1 Custom Recovery (TWRP) - Download
          • Gionee E5  Custom Recovery - Download
          • Gionee E3  Custom Recovery - Download
          • Gionee E6 Custom Recovery - Download
          • Gionee Elife E6 Mini Custom Recovery - Download
          • Gionee F103 Pro Custom Recovery (TWRP) - Download
          • Gionee M5 Mini Custom Recovery (CWM) - Download
          • Gionee M5 Mini Custom Recovery (TWRP) - Download
          • Gionee M5 Lite Custom Recovery (TWRP) - Download
          • Gionee M2 Custom Recovery (TWRP) - Download
          • Gionee M3 KK Custom Recovery (TWRP) - Download
          • Gionee P4  Custom Recovery (TWRP) - Download
          • Gionee P2 Custom Recovery (CWM) - Download
          • Gionee P3 Custom Recovery (CWM) - Download
          • Gionee P5W Custom Recovery (TWRP) - Download
          • Gionee P6 Custom Recovery (TWRP) - Download
          • Gionee P5l Custom Recovery (TWRP) - Download
          • Gionee S6 Custom Recovery (TWRP) - Download
          • Gionee S5.5 Custom Recovery (TWRP) - Download
          • Gionee V4s Custom Recovery (TWRP) - Download


          HOW TO FLASH CUSTOM RECOVERY TO YOUR MTK PHONE


          Note:  It's your sole responsibility to flash the custom recovery meant for your MTK android phone. Flashing or messing things around would definitely brick your phone. In as much as the files are downloaded here, we aren't responsible for any issue, but please endeavor to follow the rules.


          ❆ USING MOBILEUNCLE TOOLS APK


          Mobileuncle is a very popular Android tool which is very useful for MTK phone users. To flash the custom recovery via Mobile Uncle Tools, kindly follow the steps below.

          • Download and install Mobile Uncle Tools to your phone
          • Turn off your internet connection
          • Download the "recovery.img" file and place it in your SD card or memory.
          • Open Mobile Uncle and select "Recovery Update"
          • Select the custom recovery file you downloaded.
          • Flash the recovery.
          • You can now reboot into the recovery if you wish.


          ❆ USING FLASHIFY APK


          Flashify apk can be used to flash recoveries to your Android device without a computer. Below is how to use flashify to flash recovery images.

          • Root your device. You can try KingRoot.
          • Download Flashify and install it on your phone.
          • Put the "recoveryi.mg" in your SD card
          • Open Flashify.
          • Select "Recovery image"
          • Select "Choose a file"
          • Select "Flashify file manager"
          • Now choose the "recovery.img" file you downloaded.


          ❆ USING SP FLASHTOOL 


          If the custom recovery you downloaded has a scatter file inside the archive, you can flash it via SP Flashtool. If you have a scatter file for the device, you can also use it. To flash the custom recovery via SP Flashtool, follow the steps below.
          • Download SP Flashtool and extract the contents to your PC
          • Copy the downloaded custom recovery and extract it to access the contents.
          • Launch SP flashtool i.e "flashtool.exe"
          • Click on "Scatter Loading"
          • Locate the scatter file from the recovery folder or load the scatter file from the devices's stock rom.
          • Make sure the recovery is loaded and only recovery is ticked. If it's not loaded, doubled click the recovery section, choose the custom recovery file.
          • Now click on Download in SP Flashtool.
          • Turnoff your phone and connect it to the PC.
          • The recovery would be flashed to your phone.
          • Boot into recovery using Key combos (Power and Volume buttons) to avoid the custom recovery to be replaced with the stock by the phone.

          ❆ USING FASTBOOT COMMANDS


          • Unlock your devices bootloader if its locked
          • Install ADB / Fastboot drivers on your PC
          • Copy the custom recovery file to the same location where ADB / Fastboot is installed
          • Open a command prompt window inside the ADB folder (Right click on an empty space and select open command window here)
          • Enable USB Debugging on your Android phone and connect it to the PC. 
          • Accept any USB Debugging prompt.
          • Type adb devices in the command window and hit the enter button. Your device would be detected.
          • Type adb reboot-bootloader and hit enter button as well. Your device should now boot into fastboot / bootloader mode.
          • Now type fastboot devices and hit enter. Your device id should now display.
          • Type fastboot flash recovery.img and also hit enter key. Make sure the file name matches and the recovery file is placed inside the ADB / Fastboot folder.
          • You can then boot into recovery using the proper key combination.


          ❆ USING RASHR APK


          To successfully flash any recovery image to your compatible android using Rashr, follow the short guide below. 

          • Root your device using any of the available methods e.g via Kingroot apk.
          • Download and install Rashr.
          • Copy the recovery.img file to your SD Card.
          • Open "Rashr"
          • Accept root access prompt
          • Accept the "Warning" I know the risk.
          • Select "Recovery from storage"
          • Select the recovery which you copied to your SD crd.
          • Install it.

          You can also backup your current recovery via Rashr so that you can re-flash it in case something goes wrong.


          Credits
          Team Win Recovery Project
          AndroidVillaz
          Team Hovatek
          XDA

          If you need more assistance, just drop a comment.
          Viewing all 141 articles
          Browse latest View live